Secure Shell on Windows
GitForce uses PuTTY daemon and PLINK proxy to manage SSH keys for git commands. These executables are built into the GitForce application and do not need to be installed separately. This tutorial assumes you are setting up a GitHub project, but the same principle should apply to other SSH servers.
Click on “Settings” -> “Manage SSH Keys…” to open up an SSH dialog (you can also click on the icon of keys on the main app toolbar).

If you don’t have your own key, you need to create it.
Click on the PuTTYgen (marked as “3”) to start a PuTTY generation utility. Click on the “Generate” and move your mouse as the key is being generated, after which you should see your public key ready:
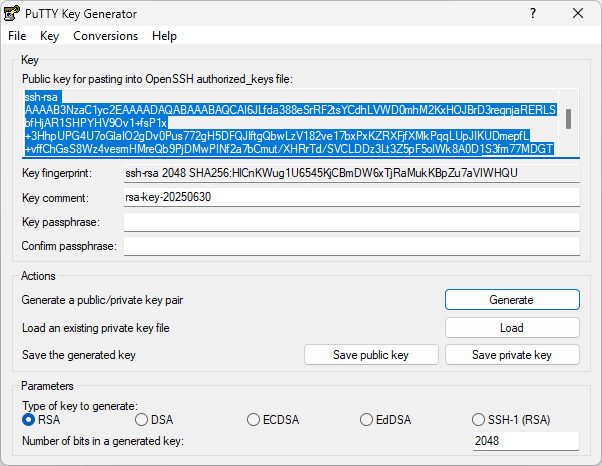
Click on “Save private key” and save the complete key pair onto your local drive (its extension should be *.PPK). We will need that file in a later step. Select all text from the public key control (starting with “ssh-rsa…”) and copy it… into the GitHub: “Account Settings” -> “SSH Keys”.
Go back to the SSH dialog and see the “Select keys to import” list box (marked above as “1”). Keys listed there will be auto-loaded next time you start GitForce. We want to add our key to this list. That’s the key we saved in a step above.
Click on the “Add…” next to the “Select keys to import” and navigate to the key you saved (its extension should be *.PPK).
Click “Import now” to import this key into the Pageant. If you open Pageant (by double-clicking on the icon of a computer with a hat in your OS status bar), you should see a key being added.

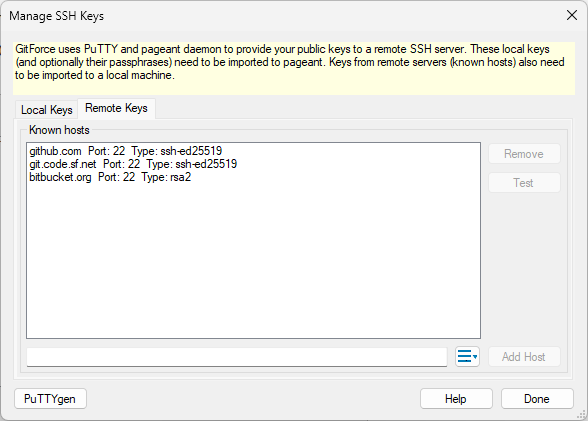
The last thing we need to do is to add GitHub’s public key to our list of known hosts. Open the SSH dialog again and select the “Remote Keys” tab (as opposed to the “Local Keys” tab, which we used thus far). Paste your project’s SSH address and click on “Add Host.” You should see github’s SSH information added to the list of known hosts:
You are ready to push/pull to your project now using the SSH protocol.