Git is a popular source revision control system. GitForce is a visual front-end for the git command line tool, which runs on both Windows and Linux. It is designed to be easy and intuitive to use and yet powerful enough so you don’t need to use a command line git.
GitForce is written in C# and uses .NET framework. The same binary file (“GitForce.exe”) runs as-is on both Windows and Linux operating systems (or any other OS with Mono support). The tool consists of only one executable file and needs no installer – just copy it to a folder of your choice and run it.
Consequently, the main requirements are having .NET support (or Mono runtime on Linux) and the actual git command line tool, which should be installed separately and working.
Git’s overall functionality and its command line tool options are incredibly numerous and too versatile to be able to wrap them with any GUI fully, so the primary goal of GitForce is to provide a useful visual front end to most common operations and then move out of the way when one may want to do a more elaborate command-line gymnastics. Therefore, GitForce does not keep much state information. Whatever you do within a git repository, GitForce can pick it up on a first refresh (F5), allowing you to mix and match command-line operations as needed.
That said, GitForce is still powerful enough to be used exclusively without calling up a command line git tool. It likely fully satisfies the needs of a great majority of users. I hope this tool will help many users who are new to git and people already familiar with Perforce (a similar source control front-end tool.)
I’ve been using this tool for work and hobby projects since 2011, when I initially wrote it, and so have hundreds of other users. I never let this code rot, and very rarely, maybe 1% of the time, I had to switch to a command line to do more complex git work.
Features
- Intuitive GUI with drag and drop
- Single executable file and no need for installation
- Runs on Windows and Linux (using Mono) and perhaps on other OS-es with Mono support
- Create and manage multiple git repos
- Easy scan for local repos
- Supports multiple remote repos
- Multiple workspaces which are sets of repos
- Multiple sets of changes independent of a single “index” mandated by the git design
- Add custom tools to context menus to customize it to your specific needs
- Easy manage SSH keys and remotes
- See files’ revision history, stash, unstash etc.
- Manage local and remote branches
- Integrated git command line interface if you still want to use it
- Users familiar with Perforce will find this UI very familiar
- Simple, intuitive and light git wrapper for all normal tasks and workflows
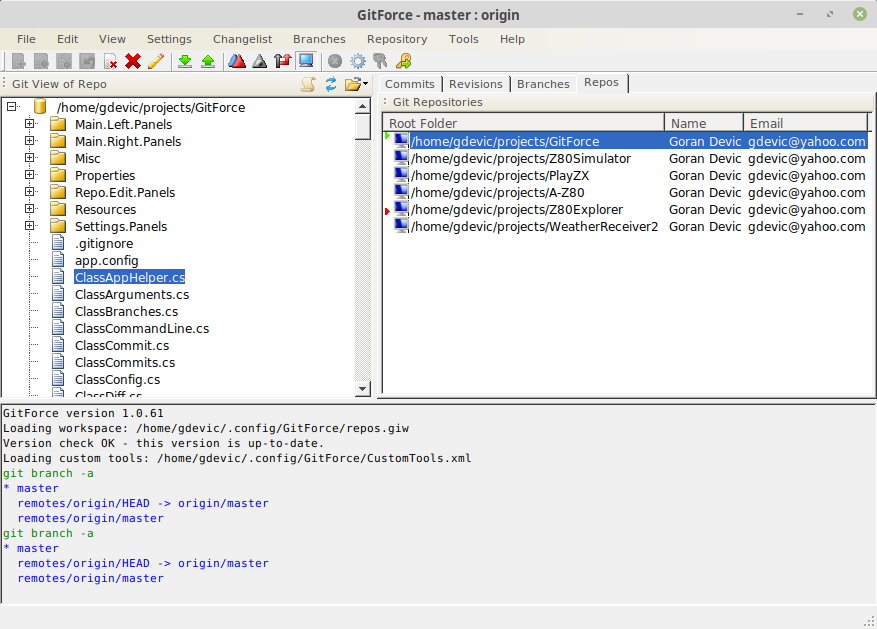
Screenshots (Windows, Linux)
Download
The latest sources and releases are checked into github: https://github.com/gdevic/GitForce
Setup
There is no installer.
Download or copy, and run the “GitForce.exe” executable on a Windows or Linux PC from anywhere you want to keep it, and the “installation” is done.
GitForce is also not dependent on where it resides in the file system; you can move it anytime to another location.
The tool needs a git command line support and a diff utility.
The screenshots shown on these pages and in the documentation may differ from the actual application due to differences in software versions and those of a particular setup (and the fact that I don’t update screenshots regularly).
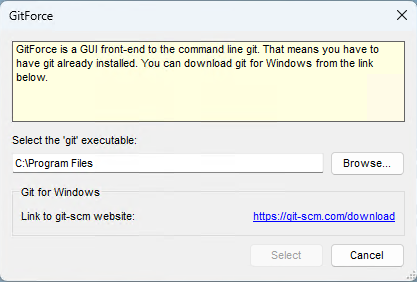
Once started, GitForce will check for the presence of git when initially launched. If it does not find it, it will offer to open a common “git-scm” distribution website. If you prefer another distribution, cancel this dialog and install git manually before restarting the application.
If you already have git installed somewhere else on your file system, browse to it and select its git.exe file.
Setup on Linux
Briefly, this is all you need to do:
$ sudo apt-get install git
Verify that you have git running by issuing a command:
$ git –version
Install one of many diff/merge tools:
$ sudo apt-get install meld
Install mono support:
$ sudo apt-get install mono-complete
GitForce has been tested to work on a few selected Linux installations, but it should work on any other modern Linux distribution if the same supporting environment is present.
These installation steps assume you have a clean operating system install with all recent updates applied (using the Update Manager). Although it assumes x64 versions, x32 versions should work just as well.
Once you have the required prerequisites described below, simply start “GitForce.exe” from a command line:
$ ./GitForce.exe
or
$ mono GitForce.exe
Most minor and cosmetic issues on Linux are caused by poor Mono implementations.
Diff and Merge Tools
When GitForce starts, it tries to detect diff and merge utilities for use. It is recommended that one of these be installed before running the application.
You can always set a diff and merge tools later from within the Settings menu.
These are a few common diffs and merge utilities that GitForce inherently knows about:
| On Windows: | |
|---|---|
| Perforce Merge Tool | https://www.perforce.com/products/helix-core-apps/merge-diff-tool-p4merge |
| WinMerge | https://winmerge.org |
| Beyond Compare | http://www.scootersoftware.com |
| KDiff3 | http://kdiff3.sourceforge.net |
| Meld | https://meldmerge.org |
| On Linux: | |
|---|---|
| KDiff3 | http://kdiff3.sourceforge.net |
| TKDiff | https://sourceforge.net/projects/tkdiff |
| Meld | https://meldmerge.org/ |
| Xxdiff | http://furius.ca/xxdiff |
| Diffuse | https://sourceforge.net/projects/diffuse |
On a Linux OS, installing some of these utilities is as simple as typing “sudo apt-get install <name>” where <name> is a specific diff or merge utility.
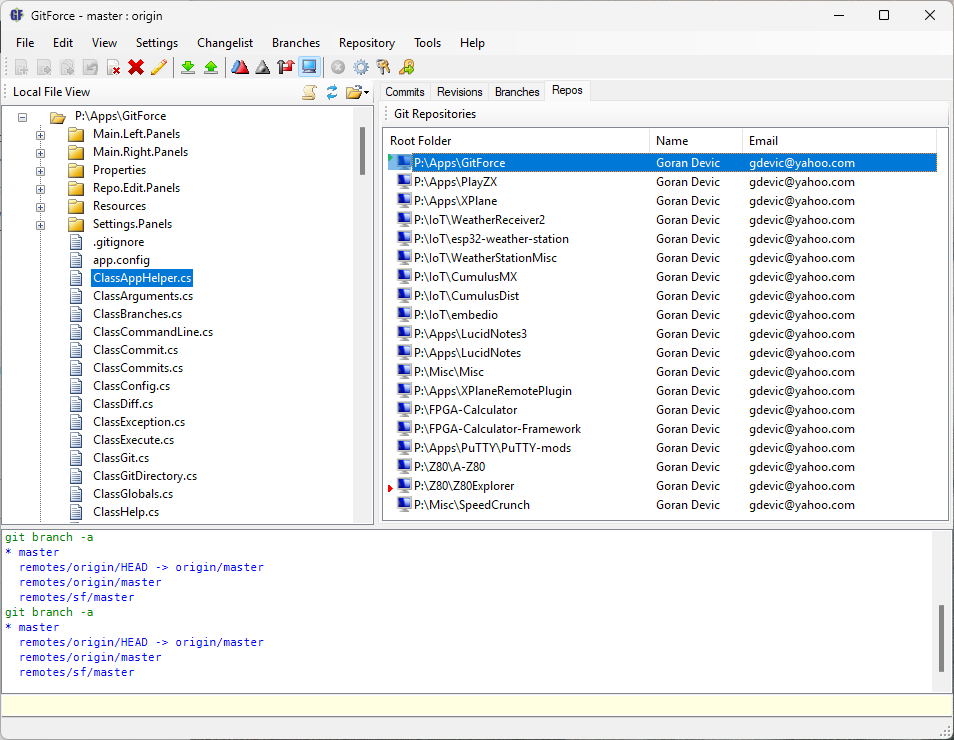
Getting Started
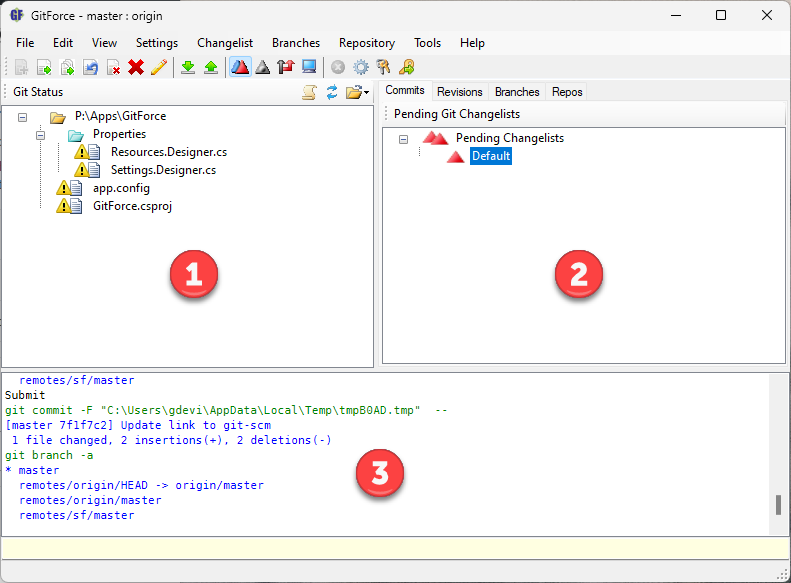
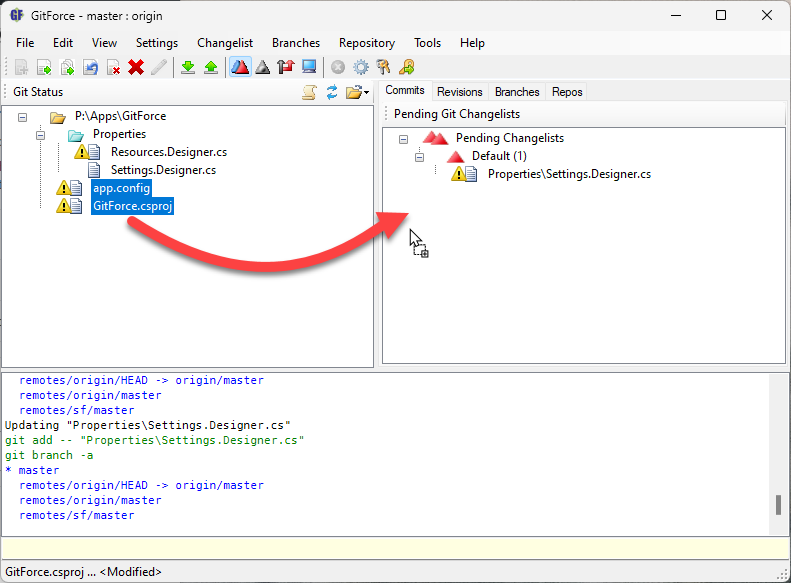
The left pane (1) shows various views of the files on your local file system and also in the git database.

The status buttons will:
- Toggle between flat view of files (no directories) and hierarchical view
- Refresh the view (the same as pressing F5)
- Select one of several view modes. These are the view modes for the left pane:
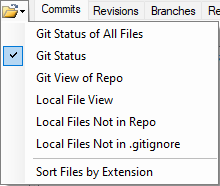
- Git status of all files in the current repository, that includes untracked (new) files
- Git status of all files, but not including the untracked (new) files
- Git view of its repo database; this view is not related to the actual local files you may have
- Local file view shows all files on your local file system
- Local files that are not part of the current repo or files that might need to be added
Files in each view can be sorted by extension or alphabetically.
The right pane (2) shows pending and submitted changelists (git index and log), branches or a list of repositories in the current workspace.
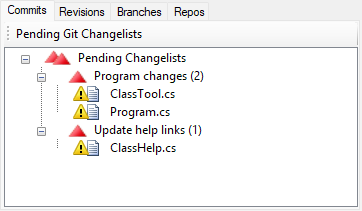
Pending Changelists (“Commits”)
A changelist contains a list of files ready to be submitted. You can add and update files in a changelist by dragging them from the view pane and dropping them onto a changelist.
Context click with a right mouse button to see the list of available operations on a changelist, or click on the Changelist option on the main menu.
The files listed in the changelists are at the git index stage. You can also create several changelists and move files between them by dragging them. This way you can submit batches of files separately since GitForce specifies files individually when committing and will treat each bundle as a separate list of files.
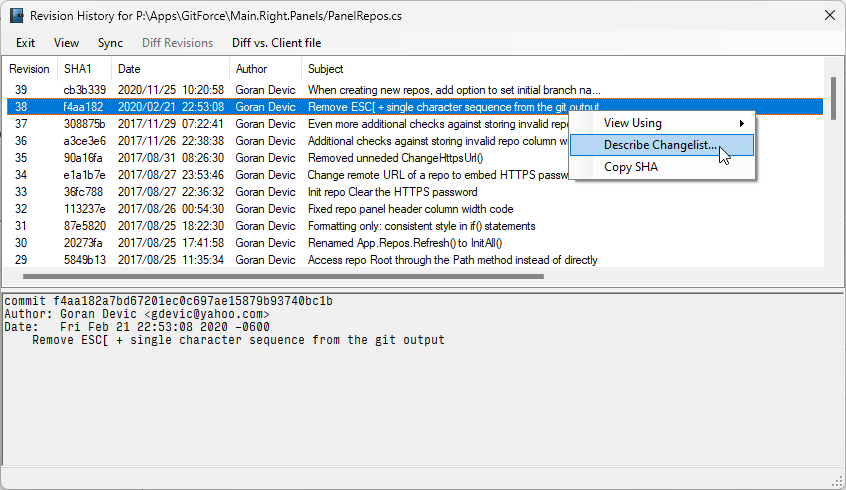
Submitted Changelists (“Revisions”)
This view shows the log of changes for the current repo based on a specific branch.

The toolbar buttons on the right side will:
- Refresh the view (the same as pressing F5)
- Set a filter to limit the list of changes based on certain constraints
- Reset a filter
- Select a branch to view
Double-click on a change to see its description and more options related to changed files.
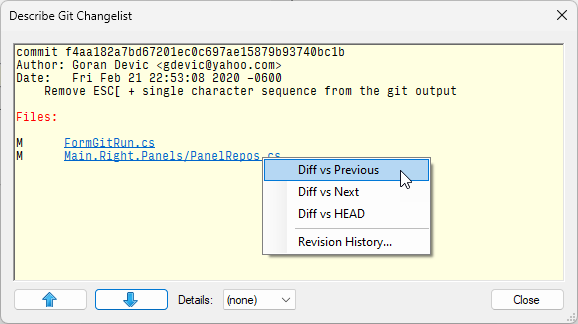
From there you can further examine file differences, revision history etc.
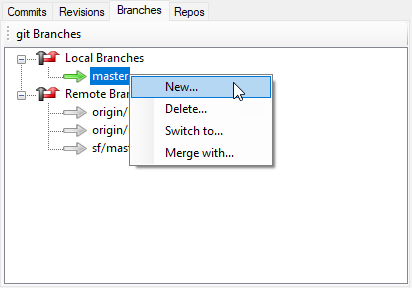
Branches
Branches show local and remote branches. You can double-click on a branch to switch to it. Right-clicking on a branch will show you more options as will selecting Branches option from the main application menu.
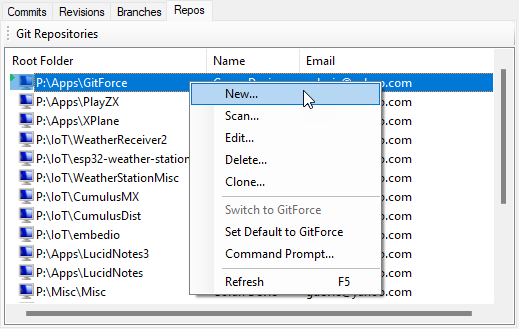
Repositories (“Repos”)
Repos list a set of git repositories available within the current workspace. The red arrow specifies a default repo which will be opened with this workspace, and the green arrow shows the current repo that the GitForce is using at the moment. Double-click on a repo to switch to it and make it current.
As usual, you can use the right mouse button to get the context menu or access all the options by selecting the Repository menu from the main application menu.
The status window (3) displays status information and lists various commands that are being executed and the results of execution.
Toolbar

Toolbar contains shortcut buttons for various operations. All commands can be accessed through the main application menu as well, and many file operations may be performed through context menus (right-click) or by dragging and dropping. Simply try what feels natural in the terms of using an UI and if something does not work as you would expect, please post your question of suggestion below. Each icon has a tooltip which should briefly explain its action.
Some of the operations on the files accessible from the toolbar (from the left-most icon):
- Add a new file to the index
- Update modified file
- Update all files that are modified
- Revert a file
- Open a file for a delete
- Remove file from the file system
- Edit a file
Remote Repos
GitForce can work with one or more remote repos. You can select the current remote repo to use for push and pull commands through the Settings menu.
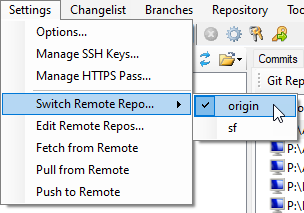
Edit sub-menu lets you edit specifications of remote repos and check their SSH access rights.
GitForce and GitHub
Assuming that you already have a GitHub account, but the project that you’d like to share on GitHub is currently only on your PC, and you would like to upload it to a GitHub.
Create a new repository on the GitHub (“Dashboard” -> “New Repository”)
If the sources on your PC is not added to git yet
- Open GitForce and select “Repository” -> “New”
- Select “New empty working repository (with or without your files already in), “Next”
- Browse to the root folder of your project and select it, “OK”
- Add your files to the index by dragging them from the left pane and onto a changelist pane
- Submit your changes by “Changelist” -> “Submit”
Your project should now be added to git and managed by GitForce.
We will be using SSH to transfer files:
- On the GitHub project page, click on SSH (on the bar with options “SSH | HTTP | Git Read-Only”) and copy the link to the clipboard
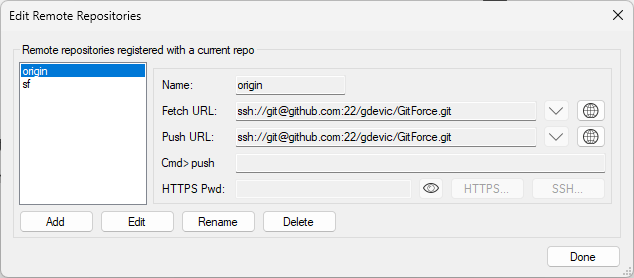
- In GitForce, click on the “Settings” -> “Edit Remote Repos…” to bring up the remote repository dialog
- Click on the “Add” to add a new remote: paste the link from github into both “Fetch URL:” and “Push URL:” fields

Now we need to generate our local private/public key pair, upload public key to github and add github’s public key to our set of known hosts.
After you have setup SSH, click on the “Settings” -> “Push to Remote” (or click on the green up arrow on the toolbar) to initiate git push command.
Your project should now be updated with the files you pushed.
Topic Help
The following links are specific topic links which are also available through the application’s Help buttons, where available:
Feedback?
This page barely scratches the surface of what GitForce can do. Over the last decade (!) I kept updating this software with all the changes I felt were needed, as I kept using it myself. I also appreciate comments and feedback I get via email “[email protected]”.
This app is completely free; there are no in-app purchases. There are also no annoying ads or anything like that. If you like the app and end up using it regularly, you could always buy me a coffee!?