The calculator described in the previous posts worked. The 2021 implementation ran on real hardware, accepted key presses, computed results, and displayed them. The arithmetic was correct in the sense that most results were right to around 12 significant digits, which is more than a typical user needs.
But “most” is not “all,” and “around 12” is not the same as the 15-16 digits a 16-digit BCD machine could and should deliver. There were edge cases where the results were plain wrong. There were iterative algorithms whose precision was acceptable but not as good as it could be. Also, during testing, I found some errors which, once I debugged them, revealed some fundamental bugs in the way I coded my C++ prototype code. That made me uneasy since I knew that, to fix it properly, I would have to redo the prototyping code from ground up, which I eventually did. I have left the old code in the repo (Pathfinding/Methods), while I developed a completely new version from scratch (Pathfinding/Proof). I promised myself this was the last time in my life I am doing that, so I tried to do it perfectly.
Hence, the 2025 revision addressed all the problems I found. It was not a patch: it was a near-total rewrite of the arithmetic engine, an enhanced set of CPU instructions, and a substantial expansion of the function library. This post covers what changed and why.
First, a Better Reference
The 2025 Proto (described in Post 3) was rewritten from scratch with full implementations of every function the calculator needs. Most importantly, it generated test vectors: thousands of input/output pairs that the calctest utility run against the actual Verilog simulation. You run ./proto -t -a > hw.txt and it outputs thousands of lines like:
ADD +1.234567890123456e+15 +9.876543210987654e+10 +1.234567890123456e+15 OK
SQRT -1.000000000000000e+00 INVALID nan
Each line is a specific input, the expected output, and a status code. The calctest utility reads these vectors and runs them against the actual Verilog simulation, comparing results. If anything diverges, you know exactly which case failed. That closed the loop between the C++ reference and the hardware: no more manual inspection, no more guessing. Qt app also can read those test vectors and you can use it to debug more complex mismatches.
Test numbers included manually written values, random values and all conceivable edge cases. They also include values that should generate errors, and these errors are also checked (that they happen). Special cases are ramp values across domain transitions which can detect even a single least significant digit being off.
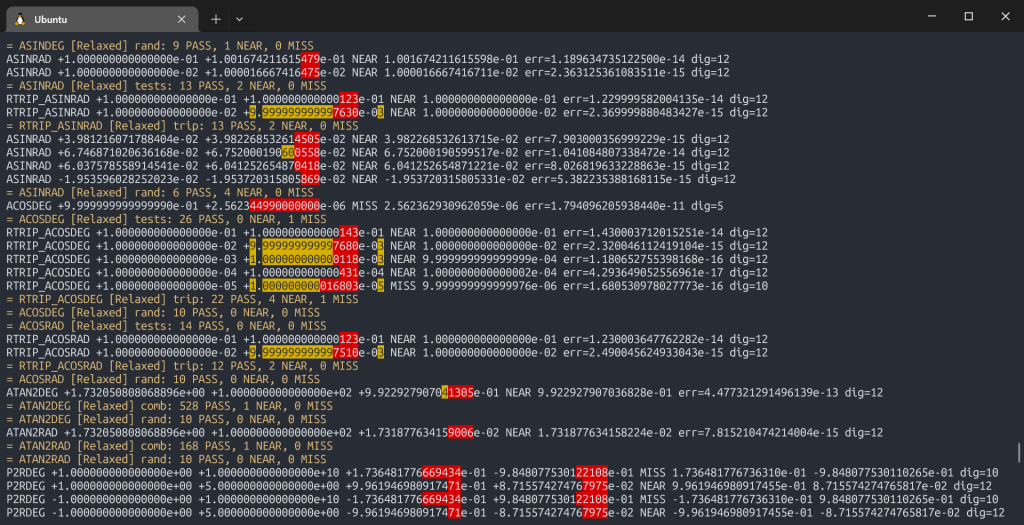
./proto -a -c) with ANSI color output, showing PASS/NEAR/MISS lines and the digit-by-digit comparison. The Arithmetic Rewrite: Guard Digits and Sticky Bits
The core problem with the 2021 arithmetic was truncation. After each operation, results were simply cut to 16 digits. That is correct in the sense that it produces a 16-digit result, but it is not exact: the 17th digit, which was discarded, often carried information about how to round the 16th digit correctly.
The 2025 arithmetic tracks the guard digit and sticky bit mechanism through each of the basic operations: addition, subtraction, multiplication, and division. They enable banker’s rounding (also called round-half-to-even): if the guard digit is greater than 5, round up; if it is less than 5, truncate; if it is exactly 5, round up only if the sticky bit is set (meaning the true value was strictly greater than x.5) or if the last stored digit is odd. This eliminates systematic bias toward rounding up on exact half-values, which matters when many rounded values are combined.
The name “banker’s rounding” is actually misleading: there is little historical evidence that banks ever used it as a standard, and the European Commission has noted that banking has traditionally rounded half-values up. The method is also called Gaussian rounding and Dutch rounding. What actually gave it broad adoption was the IEEE 754 standard of 1985, which designated round-to-even as the default rounding mode for all conforming floating-point hardware. Before IEEE 754, rounding behavior varied from one machine to the next: truncation was common, round-half-up was common, and the choice was often poorly documented and hardware-specific. IEEE 754 was the first time the industry agreed on what “correctly rounded” even meant.
For subtraction, the sticky bit serves a different but equally important role: it generates an initial borrow in the mantissa subtraction. This prevents a class of errors that the 2021 implementation suffered from. Consider:
  1.000000000000001 × 10⁰
- 9.999999999999999 × 10⁻¹
To subtract these, the second operand is shifted right by one position to align exponents. In the 2021 implementation (15 digits, no guard), the trailing 9 was simply lost. The subtraction then produced 1 × 10⁻¹⁴—approximately 9× too large. With the current implementation (16 digits: 15 significant + 1 guard), the shifted 9 is retained as the guard digit, and the correct result (2 × 10⁻¹⁵, approximately matching the true value of 1.1 × 10⁻¹⁵) is computed. The sticky bit handles cases where digits fall off beyond even the guard position, ensuring we track that additional precision was lost and can apply corrections accordingly.
The net effect: basic arithmetic (add, subtract, multiply, divide) now achieves 16 correctly rounded significant digits (within 0.5 ULP). For transcendentals, the improvement is smaller but real: square root reaches about 14.9 digits, logarithm about 14.5, exponential about 13 to 14. Every function was rewritten against the Proto reference, and every rewrite was validated against calctest vectors before being accepted.
New CPU Instructions
The more elaborate arithmetic put pressure on code space. Tracking guard digits and sticky bits through 16-nibble BCD operations adds instructions, and the 2021 instruction set did not have good tools for making compact code.
Four new instructions were added to address this: CALLI (the call-with-arguments optimization described in Post 6, which alone freed 186 words of ROM), TBLCALL for single-instruction table dispatch, BSHR for BCD division by 2 with carry chaining, and DECA for loop counter decrements that do not disturb the arithmetic carry chain. Two instructions were removed: BRANC and TEST. The combined effect freed enough ROM space to add the entire hyperbolic set without any other trade-offs.
The Trig Suite
With the code space freed by the new instructions, the 2025 revision improved on:
sin,cos,tanin both degrees and radiansasin,acos,atanin both degrees and radiansatan2(the two-argument arctangent covering all four quadrants)- Polar-to-rectangular and rectangular-to-polar conversion (both degree and radian modes)
- Better range reduction code
The trig algorithms follow a similar approach as the logarithm and exponential: a CORDIC implementing the HP-35 pseudo-division/multiplication method. Trig gets exact range reduction in the degree domain, while radian-mode trig converts to degrees first and then uses the same path. The dual conversion (each adding at most 0.5 ULP of error) is the cost that buys us better precision by avoiding multiplication with the irrational π/2 during range reduction, as described next.
Range reduction deserves a closer look, because getting it wrong tends to quickly diminish the precision as the input value scales up.
The CORDIC algorithm for trig is most precise for small angles (roughly 0 to π/4 radians, or 0° to 45°). For any larger input, you must first reduce the angle to an equivalent value in that range. The usual approach is x mod (π/2), computed as x - n*(π/2) where n = floor(x / (π/2)). This works fine for small angles. For large angles, it starts introducing increasingly large errors. These errors are governed by two distinct causes.
Consider tan(1000) in radians. 1000 / (π/2) ≈ 636.6198. To reduce its range, you need to compute 1000 - 636 × π/2 ≈ 0.9735. Both 1000 and 636 × π/2 ≈ 999.027 have similar (large) magnitude, so due to shifting required by subtraction, we may lose up to the lowest three of the sixteen mantissa digits. With larger initial values, it only gets worse, as the numbers to subtract are closer together. This is catastrophic cancellation, the first cause of the error.
The second one is the irrational constant π being stored with (only) 16 mantissa digits, which introduces a systematic error when doing operations with it. The error in the stored value of π is multiplied by n, so it grows with the input magnitude. The trig result computed from such inputs will be wrong regardless of how precise the CORDIC algorithm is.
Converting values to degrees first and then doing the range reduction lessens the impact of both errors mainly because dividing by 180, 90, 45 — which are exact integers in BCD — causes no approximation or precision loss at this step. The cancellation issue from the first cause still exists (subtracting nearby values), but the second cause is eliminated entirely: the range reduction in degrees involves no irrational constants.
Only after reducing to the range [0°, 45°) is the angle converted to radians for the CORDIC core. The radian functions (sinRad, cosRad) convert to degrees at entry and delegate to the degree path. tanRad is the exception: it stays in radians and uses a π/4-boundary reduction, which works well for small angles but degrades for large radian inputs because it reintroduces the two error sources described above.
There are techniques for radian reduction that work over a wider range. Cody–Waite splits the constant into a sum of terms (high, medium, low) so that each partial product n × c_i is exact; Payne–Hanek uses extended-precision precomputed bits of 2/π. Both add complexity, and since such exceedingly large radian values in practice are unlikely, I have not implemented them.
BCD calculators from HP have traditionally worked in degrees internally.
Sine and cosine are computed through the half-angle identity: sin(x) = 2t/(1 + t²) where t = tan(x/2). This means sin and cos share almost all of their implementation with tan, which kept the code size manageable. Arcsine and arccosine use asin(x) = atan(1/sqrt(1/x² - 1)), expressed carefully to avoid clobbering registers between the sqrt and atan calls.
The scripting layer covers a large fraction of the resulting functions. Many of the inverse and conversion variants are implemented using just a few scripting tokens on top of base CORDIC implementations.
New Functions and Keys
Beyond trig, the 2025 revision added a number of other calculator functions:
LASTX is the X register from before the last operation. Essential for error recovery: if you press the wrong key, LASTX brings back the value that was lost. Implemented as a dedicated register that pre_calc setup wrappers save automatically before every unary and binary operation.
LASTX first appeared on the HP-45 in 1973, one of several features that became permanent fixtures of HP’s calculator line. The HP-45 also introduced numbered storage registers (nine of them, in addition to the four-level stack), user-selectable trig modes (degrees, radians, grads), and a general-purpose shift key (the yellow “f” prefix, expanding on the HP-35’s more limited “arc” key). Most of what modern RPN users take for granted was established on that machine.
STO/RCL memory registers: ten user-addressable memory registers (0 through 9), stored in RAM. Pressing STO followed by a digit stores X into that register; RCL recalls it. The original version was using just a single STO/RCL memory location.
CLx/A: first press clears X, second press clears the full stack. The double-action behavior uses the input mode state machine to detect whether X has already been cleared.
HMS conversion: →HMS and HMS→ convert between decimal hours and H.MMSS format. These are a handful of scripting tokens each, using the existing multiplication and modulo primitives.
Random number: RND produces a uniform random number in [0, 1). The random number generator is a Galois LFSR implemented in hardware (Verilog), accessed via MMIO. A hardware LFSR at 50 MHz generates a new value every cycle; the microcode reads BCD-valid nibbles and normalizes the result.
GCD and LCM: greatest common divisor and least common multiple, implemented as scripting-layer Euclidean algorithms. LCM calls GCD internally. Both are binary operations (using X and Y user registers).
Combinatorics: nPr (permutations) and nCr (combinations), implemented as scripting-layer loops that avoid the factorial range limitation by cancelling factors incrementally.
DISP mode: an interactive display format and digit precision selector that replaced the earlier FScEn and Digits keys. Pressing SHIFT+EXP enters DISP mode, which shows the current setting (e.g., “FIX 4”). From there, EXP cycles the format (FIX → SCI → ENG → RAW), digit keys 0–9 set precision, dot selects full precision, and any other key exits and executes normally. The Y register refreshes live as settings change, giving instant visual feedback.
Interrupts (Because … Why Not?)
Of course a basic non-programmable calculator does not need interrupts. There is no background task that demands preemptive scheduling. The main loop polls for keys, updates the display, and waits. It is a perfectly adequate architecture for a calculator. I added interrupts anyway, simply because I felt that architecting and implementing them would be an exciting thing to do!
The interrupt handler in the microcode currently contains a single instruction: RETI.
The implementation has a few nice design properties:
Reusing the unconditional encoding gap. I assigned flag 15 to disable interrupts, FLAG_IRQ_DIS. Every conditional instruction in the CPU encodes its condition in a 5-bit field: one negation bit and four flag-select bits. The combination of negation=1, flag=15 (all ones) is hardwired to mean “always true” — that is how RET, JMP, and CALL are encoded as unconditional variants of their conditional counterparts. But the complementary encoding, negation=0, flag=15, was unused. It means “true when flag 15 is set.” That became RETI: a conditional return only executed when interrupts are disabled — which is exactly the state the CPU is in while running an interrupt handler. No new opcode space was needed; RETI fits into the existing RETC pattern with zero decoder changes. It is an alias.
Atomic return-and-reenable. RETI does three things in one instruction: it pops the return address from the instruction stack, clears FLAG_IRQ_DIS (re-enabling interrupts), and sets an internal irq_defer flop. The IRQ input is level-sensitive: as long as the line is high, the pending flag gets latched. If RETI only returned and re-enabled interrupts, the very next fetch would see the still-pending interrupt and re-enter the handler — the interrupted code would never execute. The irq_defer flop prevents this: it forces the CPU to skip exactly one interrupt check after RETI, guaranteeing that at least one instruction of the interrupted program runs before the next interrupt can be taken, thus avoiding starvation. This is exactly how Z80 returns from interrupts.
The stress test that proved it. Tie the IRQ input to logic 1: the calculator boots, runs, and accepts keystrokes while servicing an interrupt between every single instruction of the main code.
Multi-operation instruction safety. Instructions like PUSH and POP that move multiple registers loop internally across several clock cycles without returning to the fetch state. Since interrupts are only checked at fetch, these multi-cycle operations complete atomically. A PUSH 5 that saves five registers will finish all five stores before any interrupt is considered. Additionally, the post-operation stack pointer adjustment that some instructions leave for the next fetch cycle is guarded: the interrupt check explicitly requires that no such fixup is pending.
The complete mechanism includes level-sensitive latch, flag-based gating, defer flop, atomic RETI, multi-operation guards, roughly 15 lines of Verilog code to the CPU and three assembler aliases (DI, EI, RETI). Quartus reports the cost of 24 logic cells, or about 0.5% of the Cyclone II’s capacity. The CTC’s existing 100 ms tick drives the IRQ input, giving the interrupt handler a 10 Hz heartbeat. At the moment, that heartbeat does nothing. But the plumbing is there, tested, and waiting, and at 24 logic cells, it was worth it. I am hoping to use it in a future implementation.
The Toolchain
The toolchain that makes all this possible: the assembler (casm.py) and the scripting compiler (cscript.py) which grew alongside the code. Both are two-pass Python 3 scripts that read source files and output $readmemh-compatible hex that Verilator and Quartus load directly as ROM content. The assembler supports forward references, conditional assembly, multi-level file includes, local labels within procedures, and expression evaluation. The scripting compiler shares the same preprocessor and syntax conventions but generates 4-bit tokens instead of 12-bit instructions. Together they are under 1,200 lines of Python; small enough to understand completely, capable enough to never get in the way.
The Testing Picture
The precision of the revised arithmetic is characterized in Proto documentation with specific tolerance classes:
| Operation | Guaranteed precision |
|---|---|
| Add / Subtract / Multiply / Divide | 16.0 digits (0.5 ULP)* |
| Square root | ~14.9 digits |
| Natural log | ~14.5 digits |
| Exponential | ~13 to 14 digits |
| Tangent (degrees) | ~14 to 14.5 digits |
| Sine / Cosine | ~13.5 to 14 digits |
*Subtraction with near-cancellation degrades proportionally to the number of cancelled digits; this is inherent to the operation, not a bug.
The importance of systematic testing against a reference is hard to overstate. The most famous demonstration of what happens without it is the 1994 Pentium FDIV bug: a missing entry in the lookup table used by Intel’s floating-point division algorithm caused the processor to return wrong results for certain inputs, with errors appearing as early as the fourth significant digit. The bug had existed in shipping hardware for months before Thomas Nicely, a mathematics professor at Lynchburg College, found it while checking discrepancies in prime number calculations across different machines. Intel initially downplayed it; the eventual recall cost $475 million. The technical cause was five missing entries in a 1,066-entry table, a very small omission with very large consequences. The episode directly accelerated the adoption of formal verification methods for hardware floating-point units, which is now standard practice at Intel and elsewhere.
The round-trip tests (computing tan(atan(x)) and checking that you get x back) are a useful sanity check for sign errors, quadrant errors, and domain boundary bugs, but they cannot substitute for direct comparison against reference values. Both approaches are in the test suite.
What Comes Next
One post remains. The conclusion wraps up everything learned: the technology stack, the lessons, and what could be better.
The Proto BCD reference implementation is at github.com/gdevic/Proto. Algorithm documentation including precision analysis, CORDIC method details, and algorithm comparisons is in the docs/ folder.